 |
IPSDK 4.2
IPSDK : Image Processing Software Development Kit
|
|
IPSDK 4.2
IPSDK : Image Processing Software Development Kit
|
An IPSDK sub-image represents one or several planes extracted from an image. Hence, it is possible to easily extract a frame or a sub-sequence from an image sequence, a channel from a color volume sequence resulting to a grey level volume sequence, etc.
The result is not a copy of the initial image but a pointer to the same buffer. This means that its geometry information only differs for the Z, color and temporal dimensions in order to correspond to the sub-image features. The sizes along the x an y axis and its buffer type remain unchanged. To obtain a copy of a sub-image (including in the x and y dimensions), please see the getROI2dImg or getROI3dImg algorithm in the IPSDKIPLUtility module of the IPSDKIPL documentation.
All the possible image extraction functions are documented in this page. In order to use them, the following header must be included :
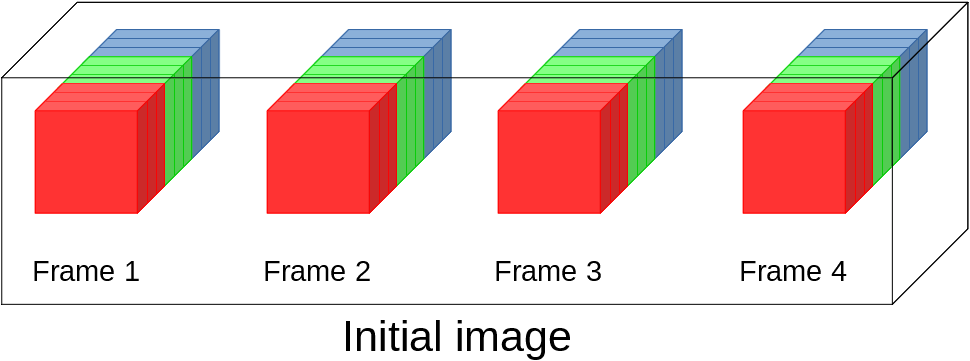
We illustrate by examples how to use these functions. We also consider that the initial image pInImg is a 3d color image sequence, i.e. sizeZ, sizeC and sizeT > 1. The following figure represents this image. In this example, the image contains 4 frames and each frame is represented by three adjacent cubes (red, green and blue) corresponding to the color channels of the 3d data. The channels are divided into three slices, which means that we chose sizeZ == 3.
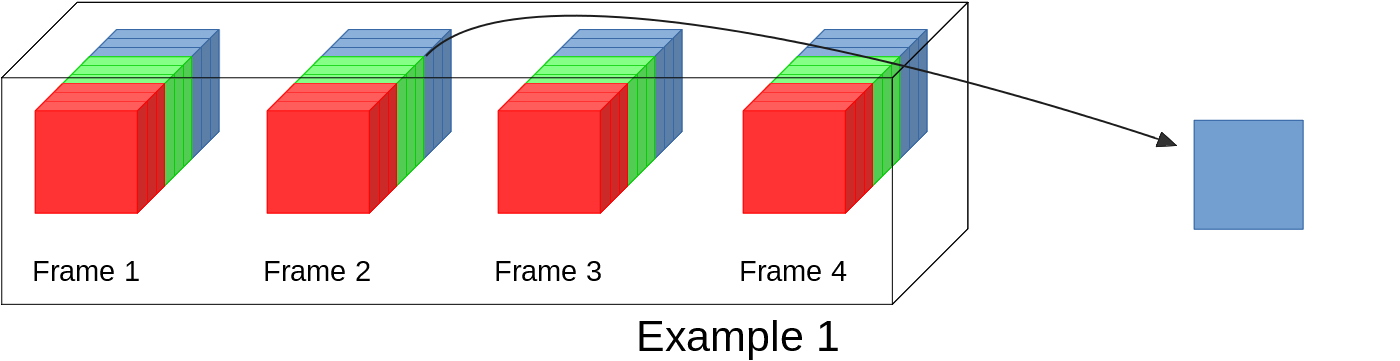
In the first example, we simply extract a plan from the initial image.
The extracted plan is the blue channel (color index = 2) of the first slice (volume index = 0) in the second frame (index = 1). Thus, we will get pSubImg_Plan->getSizeZ() == pSubImg_Plan->getSizeC() == pSubImg_Plan->getSizeT() == 1.
The figure bellow illustrates the result :
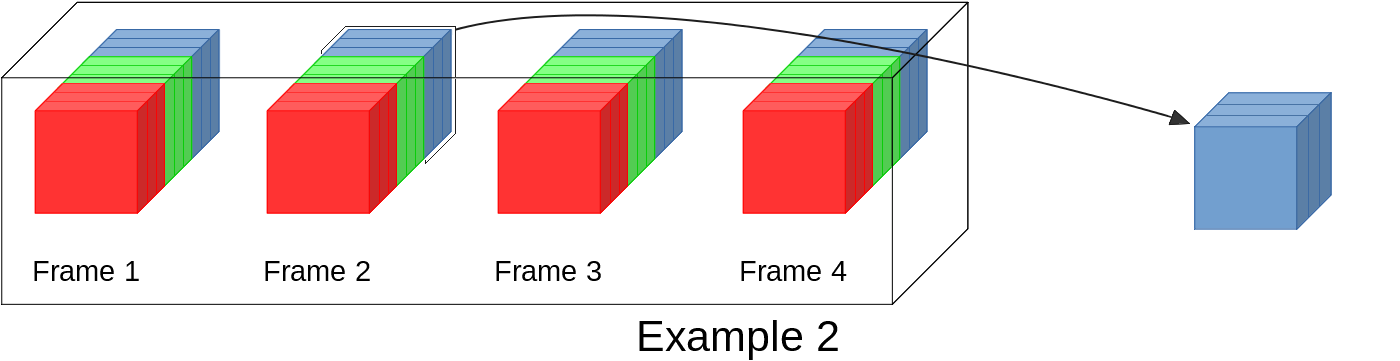
The second example shows how to extract the 3d grey level image corresponding to the blue channel (color index = 2) from the second frame (index = 1) of the initial color volume sequence.
Here, pSubImg_Volume->getSizeZ() == pInImg->getSizeZ() and pSubImg_Volume->getSizeC() == pSubImg_Volume->getSizeT() == 1.
The result can be represented by the figure below :
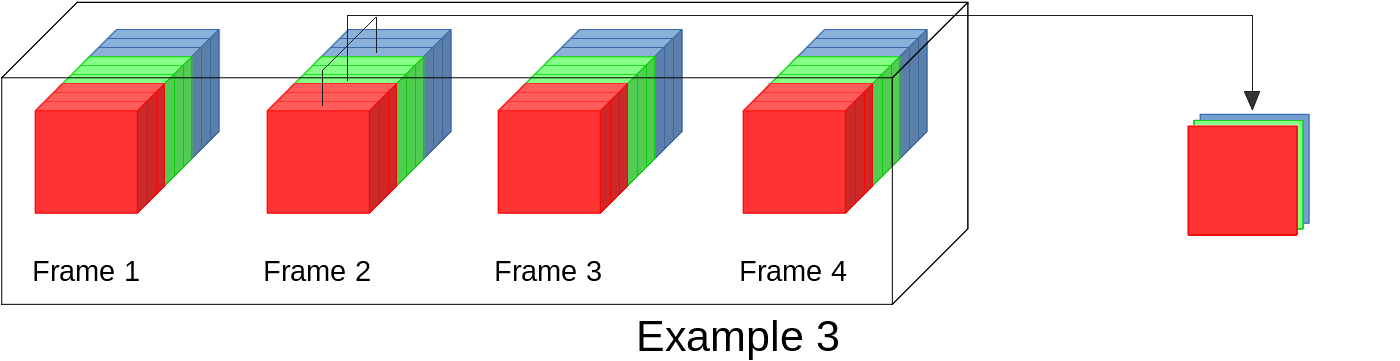
In the third example, the result corresponds to the three channels of the first slice (volume index = 0) in the second frame (index = 1) : pSubImg_Color->getSizeZ() == 1, pSubImg_Color->getSizeC() == pInImg->getSizeC() and pSubImg_Color->getSizeT() == 1.
The following figure illustrates the result :
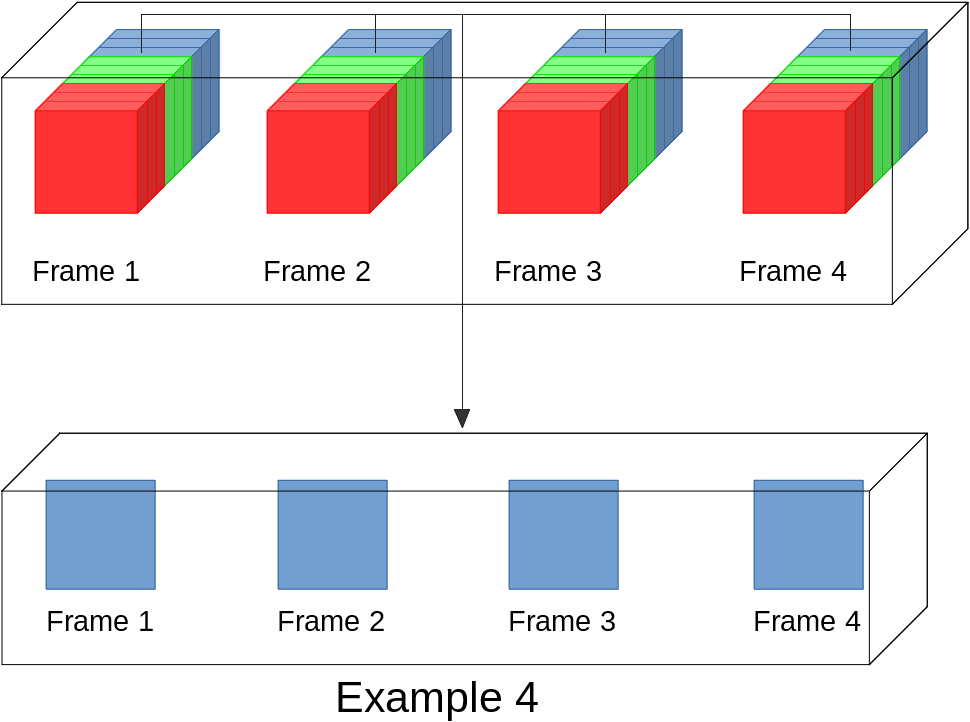
In the same way, the fourth example shows how to extract the blue channel (color index = 2) of the first slice (volume index = 0) from each frame : pSubImg_Temporal->getSizeZ() == pSubImg_Temporal->getSizeC() == 1 and pSubImg_Temporal->getSizeT() == pInImg->getSizeT().
The result can be represented by the figure below :
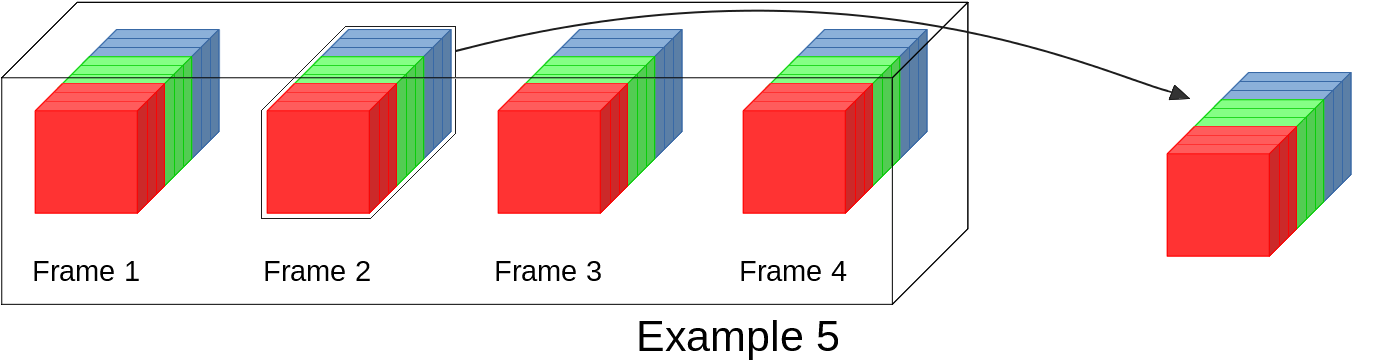
The result of the fifth example is the second frame (index = 1) : a color volume.
In this case, we have pSubImg_ColorVolume->getSizeZ() == pInImg->getSizeZ(), pSubImg_ColorVolume->getSizeC() == pInImg->getSizeC() and pSubImg_ColorVolume->getSizeT() == 1.
Here is the result of the example :
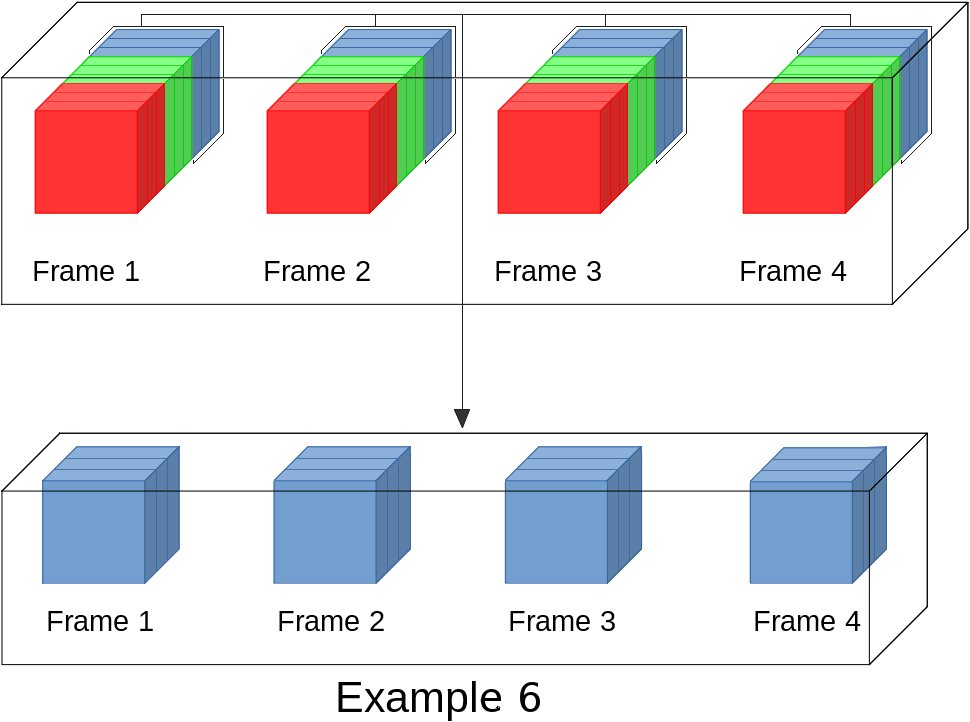
In the 6th example, the result is a sequence of grey level data : only the blue channel is kept for each slice of each frame of the volume sequence : pSubImg_TemporalVolume->getSizeZ() == pInImg->getSizeZ(), pSubImg_TemporalVolume->getSizeC() == 1 and pSubImg_TemporalVolume->getSizeT() == pInImg->getSizeT().
The following figure illustrates the result :
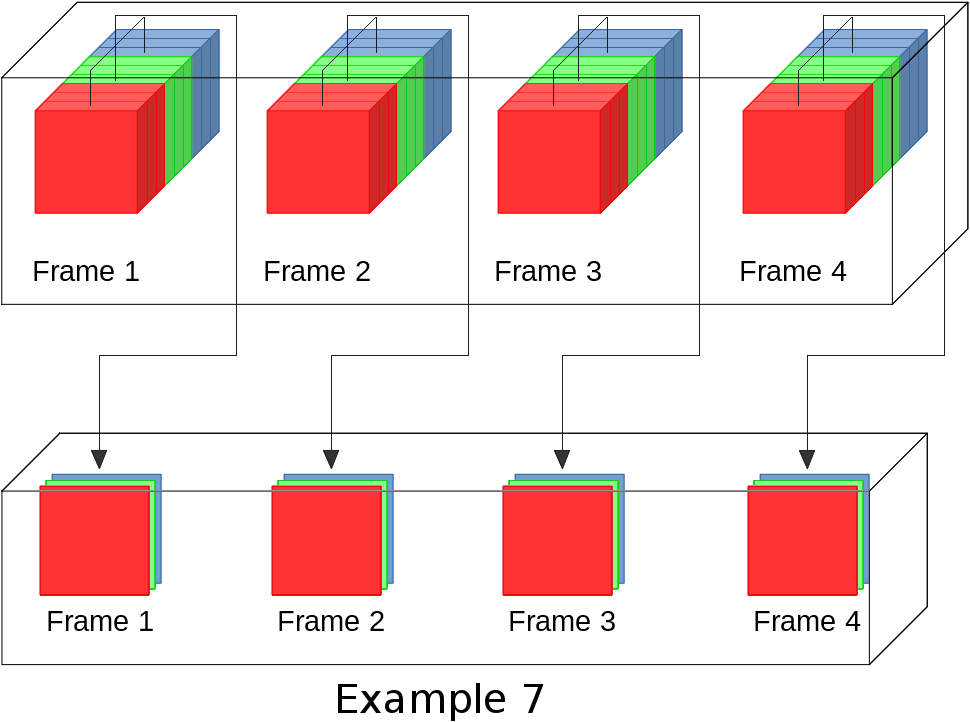
In the 7th example, the result is a sequence of 2d color data : only the first slice (volume index = 0) is extracted : pSubImg_TemporalColor->getSizeZ() == 1, pSubImg_TemporalColor->getSizeC() == pInImg->getSizeC() and pSubImg_TemporalColor->getSizeT() == pInImg->getSizeT().
The following figure illustrates the result :
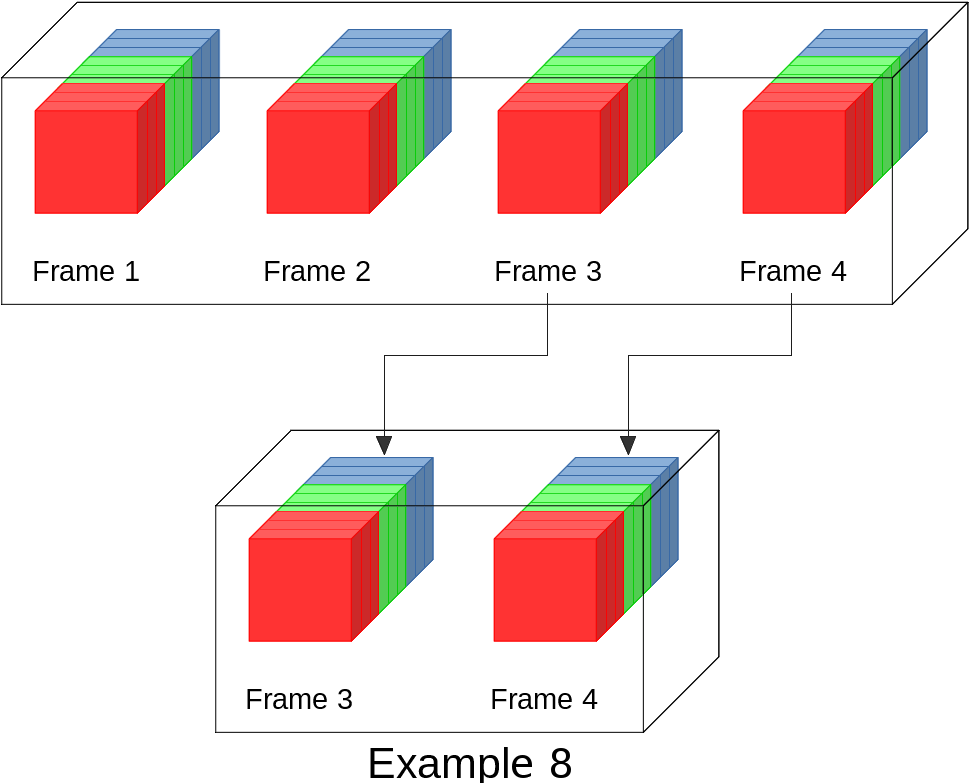
The result of the 8th example is a sub sequence of the initial image : in this case we keep only the frames 3 and 4 : we set temporalStartOffset == temporalSize == 2. Hence, we have pSubImg_SubSequence->getSizeZ() == pInImg->getSizeZ(), pSubImg_SubSequence->getSizeC() == pInImg->getSizeC() and pSubImg_SubSequence->getSizeT() == temporalSize.
The following figure illustrates the result :
Finally, the 9th example shows how to extract a sub volume from each volume of the initial image sequence. In this case, we exrtact the two first slices from each initial color volume. The dimensions of the resulting sub-image are pSubImg_SubVolume->getSizeZ() == volSize, pSubImg_SubVolume->getSizeC() == pInImg->getSizeC() and pSubImg_SubVolume->getSizeT() == pInImg->getSizeT().
The result can be represented by the figure :
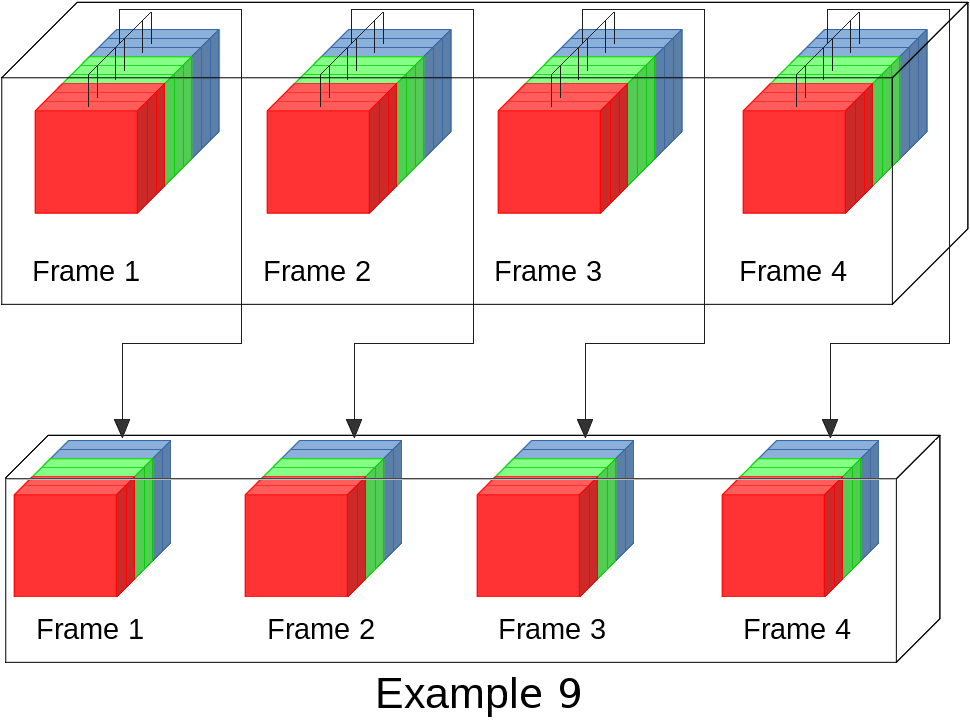
The volumes appear thiner than in the first figure. Indeed, extractSubVolume() reduces the number of slices, which means that the sub image has a lower size along the z-axis.
IPSDK have wrappers allowing to use these functions in Python. Here are the Python translation of the examples above :
If the reader has already seen the Numpy array brigde page, he may want to convert these sub-images into Python numpy arrays. However, this is not possible since the extraction result is a sub-image of the initial data and has a different IPSDK type.
If the user wants to get a numpy array from an IPSDK image, he must convert the hole image into a numpy arrays first and then use numpy functionnalities to extract the sub-data.
IPSDK allows to concatenate two or more images, whether along the Z-axis or the temporal dimension (the images must have the same size along the other dimensions). This is done by the functions concatenateVolumes and concatenateSequences respectively.
Unlike the C++ functions where we can concatenate more than two images, the Python versions allow to concatenate only 2 images :
